
DexStand Setup Guide
How to Set Up the DexStand: A Step-by-Step Guide
DexStand is engineered with a focus on simplicity, adaptability, and reliability. The setup process reflects that philosophy. Setting up your DexStand is quick, intuitive, and requires no special tools or technical experience so you can spend less time assembling and more time being productive. Whether you’re using DexStand in a venue, professional workplace, studio, or outdoor environment, this guide walks you through everything you need to know—from unboxing to final adjustments—so you can start using it with confidence while ensuring proper setup, stability, and long-term performance.
What Comes in the Box
Before you begin, confirm that all components are included.
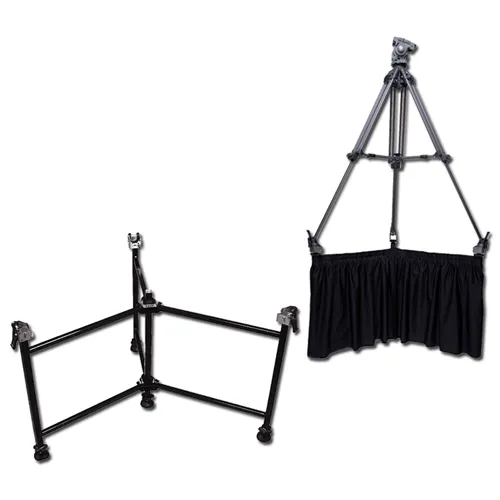
The DexStand frame with 4 adjustable feet
DexStand Footboxes (3)
DexStand Straps (3)
DexStand Strap storage pouch with instruction card inside
Laminated Quick-start documentation
If anything appears damaged or missing, contact [email protected] before continuing setup.
How Long Does It Take to Set Up DexStand?
Most users can complete DexStand setup in 10 seconds to under 1 minute, from unboxing to final adjustment. No specialized tools or technical skills are required.
Step 1: Choose the Right Setup Location
Select a stable surface that supports the DexStand. For best results:
Ensure the floor or surface is free of debris.
Allow enough clearance around the DexStand for adjustments.
Step 2: Unfold the DexStand
Remove DexStand from the carrying case.
Place the feet on the ground.
With the label in front of you, pull the legs apart until the spring pins engage.
Move the lanyard connected safety pins on the lower level of the DexStand to the holes that go through the leg. This ensures the DexStand is locked and can not fold accidently.
Check stability of the DexStand on the surface. If necessary, unscrew the foot or feet until the DexStand is steady. There is 3.5" of usable thread on the feet. Do not exceed 3.5".
LOCK each new foot position with the locking knob. A 5 degree slope can be achieved.
Check that the Footboxes are aligned to accept tripod feet. LOCK in position with the knob located beneath each Footbox. (If installed) the DexStand Straps will be attached below the Footboxes or stored in the zipper pouch with an installation instruction card.
The DexStand is your foundation. Proper alignment here ensures optimal performance.
Step 3: Attach and Adjust the Tripod
Once the DexStand base is secure, attach the tripod.
(Hint: Set the height of the tripod before attaching to the DexStand.)
Spike foot tripod:
Place the spike foot tripod on the DexStand footboxes resting on the horizontal pin.
Pull standard Rubber Yoke onto the spike foot like you would a tripod's floor spreader or dolly. (Pro tip: If it is too hard to pull into position start with the spike resting inside the open footbox, loosely drape the yoke on the foot. Step on the lower bar of the DexStand and use leverage to pull the tripod leg UP and onto the horizontal pin. Reverse procedure to easily remove yoke.)
Repeat for each leg.
Rubber foot or Smooth leg tripod:
Place the foot inside the open DexStand Footbox.
Press the spring button on the side of the Footbox to move the door upward, closing and locking the Footbox. This securely traps the leg but leg can still move a little. (Use DexStand Strap to lock in place if you want to move it as a unit.)
Repeat for each leg.
DexStand Strap: Can be used to secure ALL tripods, alone or in combination with the other methods.
With tripod in place, wrap the DexStand Strap around or through the leg 1, 2 or more times for friction. Buckle and pull strap tight.
Repeat for each leg.
DexStand is designed to be adaptable, so take a moment to test for movement when finalizing adjustments.
Step 4: Configure for Your Use Case
This step is where DexStand truly shines—customize it to work the way you do. Adjust the DexStand to match your specific work environment.
Set height, slope or angle for ergonomic comfort. Gently apply pressure to confirm stability.
Ensure camera balance and even weight distribution. Verify that all locking points are secure.
Confirm that the DexStand remains stable during normal use. Make any fine adjustments needed for alignment.
Once confirmed, your DexStand is ready for use.
Common Setup Mistakes to Avoid
To ensure the best experience, avoid these common errors:
Skipping the stability check.
Placing the DexStand on uneven or soft surfaces without adjustment.
Over-tightening adjustment points.
Ignoring clearance space for adjustment.
An extra minute during setup can prevent long-term issues.
How Long Does It Take to Set Up DexStand?
Most users can complete DexStand setup in under 1 minute, from unboxing to final adjustment. No specialized tools or technical skills are required.
Tips for Long-Term Use
To keep your DexStand performing at its best:
Periodically check adjustment points
Clean surfaces with a soft, dry cloth
Re-adjust as your workspace or needs change
Proper care ensures durability and consistent performance.
Frequently Asked Questions (FAQ)
Do I need tools to set up DexStand?
No. DexStand is designed for tool-free or minimal-tool setup, depending on the model.
Can I move DexStand after setup?
YES! DexStand can be repositioned as needed. Always re-check stability after moving it.
Is DexStand adjustable after installation?
Absolutely. DexStand is built for ongoing adjustment to support different use cases.
Refer to the documentation included with your DexStand or visit the Resources section on DexStand.com for updated guides.
Why DexStand?
DexStand is engineered with a focus on simplicity, adaptability, and reliability. The setup process reflects that philosophy—fast, intuitive, and user-friendly—so you can spend less time assembling and more time being productive.
Ready to Get Started?
Your DexStand is now set up and ready to support your workflow. For additional tips, advanced configurations, or product updates, explore more guides in the DexStand Resources section.
If you need assistance, our support team is always here to help at [email protected].
